
Update! Check out our new Square Foot Gardening Infographic for even more tips, diagrams, a plant list and much more.
I recently stumbled upon a book (All New Square Foot Gardening: Grow More in Less Space! by Mel Bartholomew) with an interesting gardening method called square foot gardening, and decided we would give it a try. I’ve always thought the idea of having a vegetable garden would be a lot of fun. Walking out to your square foot garden and picking a fresh tomato for tonight’s dinner appeals to the self-sufficient nature of most frugal individuals.
I know just enough about gardening to know that I am not very good at it, and that it is a lot of work. My kids have always been fascinated with the idea of growing things, but our soil and our dog make planting anything in the yard impossible. Enter square foot gardening.
What is Square Foot Gardening?
The idea behind square foot gardening is that you can plant fruits, vegetables and flowers in raised beds, above infertile soil and even out of the reach of pets. Seeds are planted in 1X1 square foot plots, and when harvested a new plant is installed in the square. Raised beds can sit directly on the ground, or include a bottom layer and be placed on patios, decks or porches. Because of a bad back, and a dog with a propensity to dig up our new plants, we decided to build a 4×2 foot table-top design.
Materials Needed to Set Up a Square Foot Garden
Material costs are variable, depending on the size of garden you plan to build. I personally opted for a 4′ by 2′ configuration because it fit the table we were planning to use. Most people typically start with a 4′ by 4′ design for their first square foot garden. I’ll share with you what materials I used, but keep in mind the pricing could be higher or lower depending on your local costs of lumber, soil, etc.
(1) Sheet untreated plywood – $0.00 (leftover scrap from a previous home improvement project)
(2) 2x6x8 pieces of untreated lumber – $7.38
Don’t get treated lumber because treatments can seep into the soil and contaminate your planting area.
(8) #8 x 3″ Wood Screws (or deck screws) – $2.94
Use these longer screws to connect the corners of the 2×6′s after cutting to the desired length.
(8) #6 x 1″ Wood Screws – $0.98
These were used to anchor the nylon line to create a grid system for the 1×1 planting plots. I also used a few to fasten the sheet of plywood to the 2×6′s to create a bottom to my container.
(1) Pack of Twisted Nylon Line – $4.43
I used this and the smaller screws to create a grid system on top of the container, in 1×1 square foot patterns.
(2) 2cu ft. bags of Miracle Grow Garden Soil (for flowers and vegetables) – $13.54
There were more frugal recipes here for soil, such as 1/3 compost, 1/3 peat moss, and 1/3 vermiculite. However, I could not find the ingredients packaged locally and the individual ingredients bought separately at the larger home improvement stores were more expensive the bags of Miracle Grow. If you have some compost to mix, such as soil generated from a Mantis ComposT-Twin composter, it would really help your soil.
(10-pack) Strawberry plants – $3.98
(1) Burpee Seed Pack Super Sugar Snap Peas – $1.57
(1) Burpee Seed Pack Tomato, Early & Often Hybrid – $2.47
(1) Burpee Seed Pack Cucumber, Burpless Beauty – $1.88
(1) Burpee Ambrosia Cantaloupe – $1.57
(1) Burpee Danvers Half-Long Carrots – $1.28
I buy our seeds from Burpee Seed Company. Check out the banner at this end of this post for a special offer for Frugal Dad readers.
Total Start-up Cost: $42.02
Building a Square Foot Gardening Box
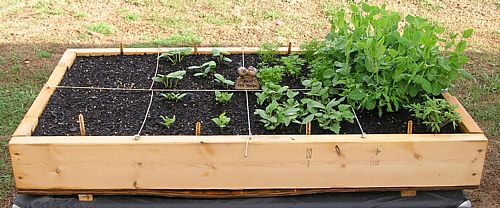
It was my daughter’s idea to use popsicle sticks to mark the type of fruit or veggie planted. We will fill in the remaining squares after we eat another round of popsicles!
Since we decided to go with raised beds on a table top I checked the dimensions of the table and came up with a suitable size for our square foot gardening container. Four feet by two feet would allow for eight square foot plots for planting. First, cut the 8ft. long 2x6s down to size. Next, position the 2x6s on the table in a rectangular pattern, alternating corners to make the “inside box” dimensions four feet by two feet (I chose not to alternate corners because the table I was working with was only 45 inches wide, so I needed it to be a little narrower). Fasten the sides using the #8×3″ wood screws. If you have trouble with the wood trying to split you may want to first drill pilot holes.
With the sides now fastened it is time to attach a bottom to the container, unless you are planning to put the raised bed directly on the ground. If this is the case, use some cardboard or weed blocking fabric to discourage grass and weeds from coming up through the soil. In my case, the container will be placed on a table top so I needed to attach a bottom to hold the soil in place. Fortunately, I had some untreated plywood I ripped to size. The bottom doesn’t have to be thick, so 1/4″, 3/8″ or 1/2″ plywood would do just fine. Fasten the bottom to the container using the #6×1″ wood screws (assuming you didn’t use 1″ plywood).
Plan for drainage by raising the box up a couple inches. I ripped a couple scraps from the remaining 2x6s and used them to attach four 2″ feet for each corner of the box. I also drilled a few 1/8″ thick drainage holes in the bottom of the box to allow standing water to flow out the bottom.
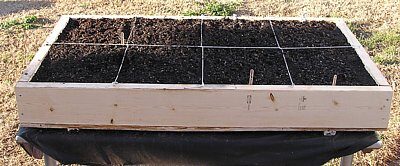
Create a grid system on top of the square foot gardening container using nylon line and #6×1″ screws, spaced a foot apart across the width and length of the container. Drill the screws about half way into the top of the 2x6s, leaving enough room to tie a knot of nylon line around the screw. If the end of the nylon line frays after cutting (as mine did), use a lighter to gently melt the ends to prevent further fraying.
Irrigating a Square Foot Garden
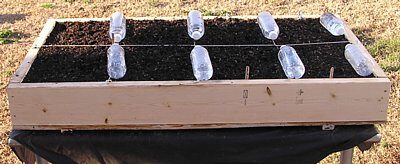
*Unless you already have a drip line and timer prepared for your garden, you’ll have to water manually early on to improve seed germination. If the air is particularly dry, or hot, you will need to constantly keep the soil moist until seeds have sprouted and taken root. One economical way to do this is to fill used water bottles and poke a small hole or two in one side of the bottle using a safety pin. Use your finger to dig a 1/2″ deep trench the length of the bottle and lay the bottle on its side, pin-prick side down, over the trench. The water will slowly drip into the trench, keeping the soil moist for several hours. Obviously when sprouts begin to appear above the surface you want to be sure not to position a bottle directly on top of the struggling plant.
Perform this routine first thing in the morning so soil gradually soaks and then dries throughout the day, and is driest overnight. This reduces the chance of fungus or diseases developing. This is even more important when the plants begin to develop leaves – avoid wetting leaves at all costs as it encourages disease.
*I’ve since improved on this irrigation system as I became more aware of the dangers of heated plastic leeching bad things into the soil
I’m not sure what to expect from this effort in terms of food yields, but just the process of building the box, filling it with dirt and planting seeds with my kids was worth the $40. If the small garden yields a few fruits and veggies during the spring and summer then all the better. Who knows, if we can cultivate a good crop we may build more boxes next summer and section off an area of the yard so the dog does not eat our produce.
I think over time it will help my kids understand the true value of things. Those strawberries don’t just wind up in the produce section of our local grocery stores. As I pointed out to my daughter today someone has to plant the seeds, water the plants, harvest the crops, clean the strawberries, package them, and transport them to a distributor.
Additional Resources: